To create a serverlogo you first need a logo in one of these sizes: 64x64, 128x128 or 256x256 in .pcx - format. To create it use some software like Adobe’s Photoshop or some other programs which are able to save pictures and logos as .pcx - files. Logo must have 256 colors (important, otherwise it will not work or the logo will not be displayed properly). Make sure your logo got a unique name in order to avoid later ‘version – mismatches’.
After your custom logo is saved as .pcx - file, start Unreal Editor and import it with ‘Texture Browser - File - Import’.
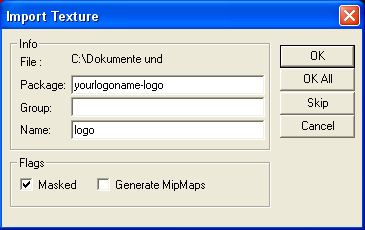
The Import Window should look like this:

Package: insert the name of your logo here! (e.g. yourlogoname-logo)
Group: leave this field empty!
Name: logo
Generate MipMaps: uncheck this option!
Masked: should be checked (at least from size 128x128 to 256x256)
Now save the imported logo with the identical name (e.g. yourlogoname-logo) to get the .utx - file. Upload this file to your server (‘Tactical Ops/ Textures’ – folder).
Now you need to edit your server.ini. Look for the following sections and add your logo as ServerPackage:
[Engine.GameEngine]
ServerPackages=yourlogoname-logo
and in this section:
[TOSTClient.TOSTClient]
CustomLogoTexture=yourlogoname-logo.logo
CustomLogoHeight= add here a number according to your logo’s size (64, 128 or 256)
Now you’re almost done with it. Just save the modified server.ini and upload it to your server. Restart your gameserver and enjoy your custom logo when connecting to the server.
Report Article

There are no comments to display.